Brighter3D – Manual

This page explains every control in the Brighter3D settings window. Click a numbered marker on an image to jump to the corresponding description, or click a number in the list to highlight it on the image.

Basic

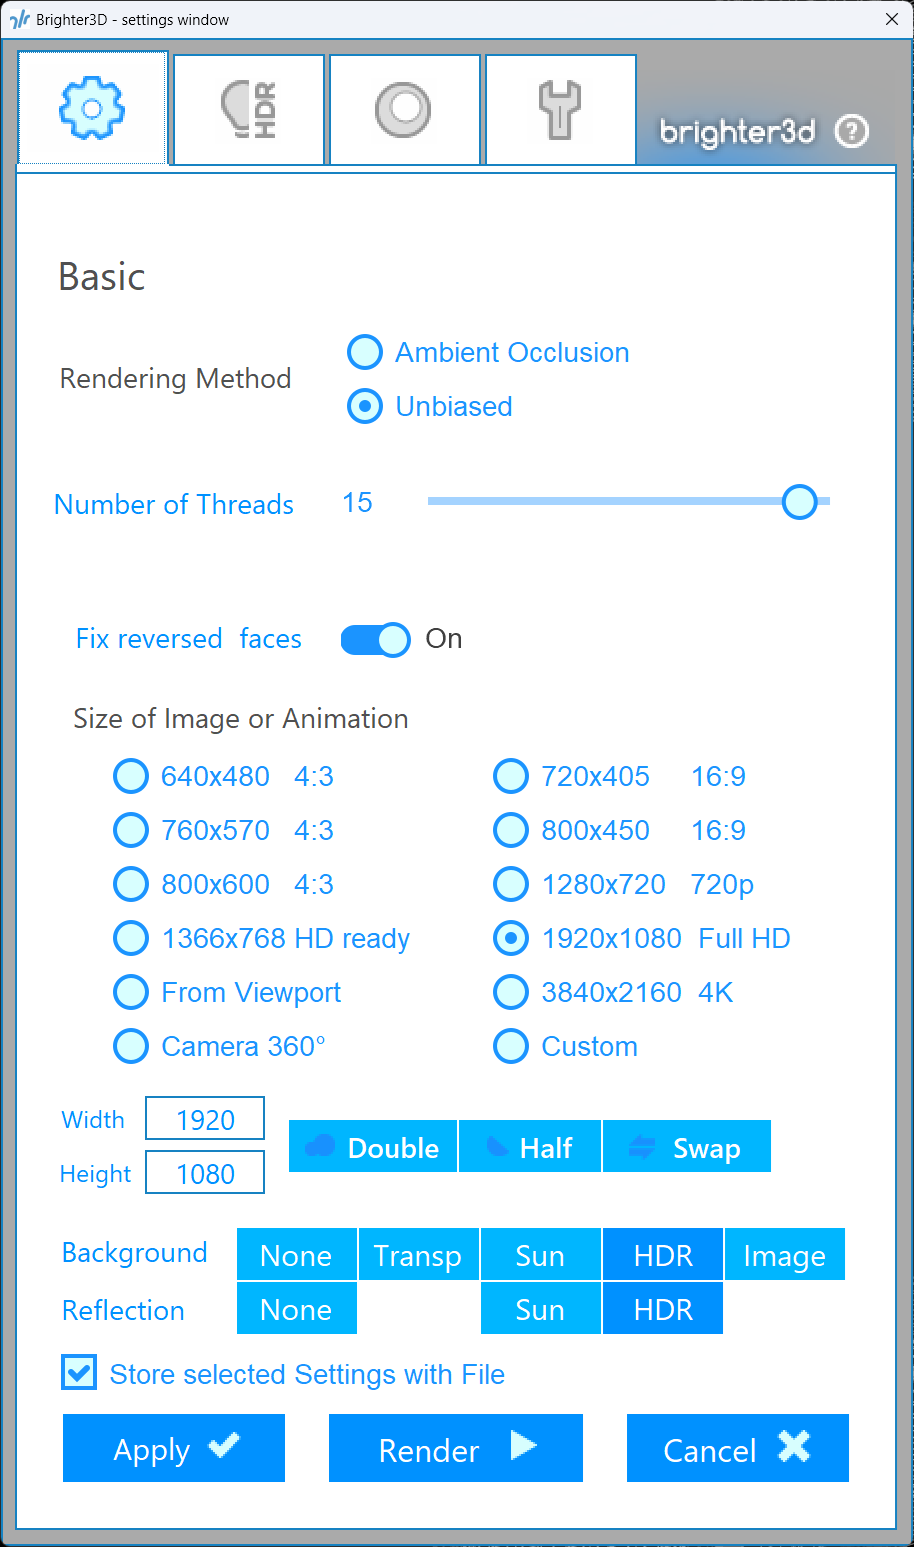
  1. 1 Ambient Occlusion is the simplest and fastest rendering mode. It does not require any light setup, making it ideal for quick previews or scenes where lighting complexity is minimal. This mode simulates soft, indirect lighting to enhance depth and realism in shadowed areas. It can be combined with daylight for more dynamic results
  2. 2 Unbiased is a high-quality rendering mode that iteratively refines the image to converge on a physically accurate result. This mode is computationally intensive but produces realistic lighting, shadows, and reflections based on real-world physics
  3. 3 Number of Threads This setting determines the number of CPU threads allocated to the rendering process. The recommended value is the number of logical CPU cores minus one. For example, if your system has 8 logical cores, set this to 7 to reserve one core for other system tasks, preventing slowdowns or unresponsiveness during rendering.
  4. 4 Fix reversed faces option attempts to automatically correct flipped faces (normals pointing in the wrong direction) during ray tracing. This is useful for ensuring proper geometry rendering in most materials. However, this feature does not work reliably for transparent materials like glass. In such cases, you must manually correct the face orientation in SketchUp
  5. 5 Preset resolutions option allows you to select from predefined image resolution presets for your rendered output. Common resolutions include standard sizes like 1920x1080 (Full HD), 1280x720 (HD), or 3840x2160 (4K)
  6. 6 From Viewport option sets the rendered image resolution to match the current viewport size in SketchUp. This ensures that the render matches the exact framing and composition seen in the viewport
  7. 7 360° Camera mode renders equirectangular images, which are ideal for creating high-dynamic-range (HDR) maps used in lighting setups or for viewing in 360-degree virtual reality (VR) applications. This mode captures a full spherical view of the scene
  8. 8 Custom This option allows you to manually specify the width and height of the rendered image, offering full control over the output resolution.
  9. 9 Width Width of the rendered image in pixels. This value determines the horizontal resolution of the output.
  10. 10 Height Height of the rendered image in pixels. This value determines the vertical resolution of the output.
  11. 11 Double doubles both the width and height of the current resolution, effectively quadrupling the total pixel count (e.g., a 1920x1080 image becomes 3840x2160). This increases image detail but significantly increases rendering time
  12. 12 Half halves both the width and height of the current resolution, reducing the total pixel count to one-quarter of the original (e.g., a 1920x1080 image becomes 960x540). This reduces rendering time at the cost of lower image detail
  13. 13 Swap This option swaps the width and height values of the image resolution, effectively rotating the aspect ratio (e.g., a 1920x1080 image becomes 1080x1920). This is useful for changing between landscape and portrait orientations
  14. 14 Background selection determines what appears behind your 3D scene in the render. The available options are:
    None Renders the background as solid black. Useful for isolating the model or when a background is not needed.
    Transparent Saves the background as transparent when exporting to formats like PNG that support alpha channels. Ideal for compositing the render into other images or videos.
    Sun Uses a daylight background, simulating natural outdoor lighting. Best for scenes that require a realistic sky or sunlight.
    HDR Uses an HDR or EXR map as the background, providing high-fidelity lighting and reflections. Ideal for professional visualizations or scenes requiring complex lighting.
    Image Uses a user-specified JPEG or PNG image as the background. Useful for custom backdrops or matching specific environments.
  15. 15 Reflection selection determines the environment used for reflections on reflective surfaces in your scene. The available options are:
    None No reflections are rendered on surfaces, resulting in a flat appearance for reflective materials.
    Sun Uses a daylight map to generate realistic reflections, simulating natural outdoor lighting.
    HDR Uses an HDR or EXR map to create detailed and realistic reflections, ideal for high-quality visualizations.
Basic tab – Brighter3D settings 1 2 3 4 5 6 7 8 9 10 11 12 13 14 15

Artificial Lighting & HDR

  1. 1 Direct Lights option enables or disables direct artificial lighting in your scene. Direct lights are explicit light sources (e.g., lamps, spotlights) that emit light directly onto surfaces, creating shadows and highlights.
  2. 2 Indirect Lights option enables or disables indirect artificial lighting. Indirect lighting simulates light that bounces off surfaces, contributing to softer, more diffuse illumination in the scene.
  3. 3 HDR Lighting option enables or disables image-based lighting (IBL) using an HDR or EXR map. When enabled, the HDR map influences the scene’s lighting, providing realistic ambient illumination based on the map’s content.
  4. 4 Indirect Samples option controls whether HDR indirect samples are used in the rendering process. These samples calculate how light from the HDR map bounces within the scene, enhancing realism. Disabling this option is recommended for indoor rendering, as indirect HDR lighting may produce unwanted results in enclosed spaces.
  5. 5 Use HDR Map allows you to select an HDR or EXR file to use for lighting, reflections, and/or background in your scene. The chosen HDR map defines the lighting environment and can significantly impact the mood and realism of the render.
  6. 6 Selected file path Displays the file path of the currently selected HDR or EXR map. This helps you confirm which map is being used for lighting, reflections, or background.
  7. 7 Remove option clears the currently selected HDR or EXR map, resetting the lighting, reflection, or background to default settings (e.g., no HDR map).
  8. 8 Mapping Mode determines how the HDR map is applied to the scene. The available options are:
    Dome: Projects the HDR map as a dome around the scene, providing even lighting from all directions. Best for near to floor level camera.
    Sphere: Maps the HDR map onto a spherical environment.
    Direction Only: Uses the HDR map for directional lighting without affecting the entire environment.
  9. 9 Direct Lights (2^x) Number of sample lights from HDR (e.g. 10 → 1024). The default value is fine most of the time.
  10. 10 HDR Mapping Scale adjusts the apparent size of the HDR map in the scene, affecting the "world size" impression. This setting only applies in Sphere mapping mode. A larger scale makes the HDR environment appear farther away, while a smaller scale makes it appear closer.
  11. 11 Rotation setting rotates the HDR map around the scene in degrees, allowing you to adjust the orientation of the lighting and reflections. This is useful for aligning key light sources or background elements with your scene’s composition.
  12. 12 Preview option displays a thumbnail of the currently loaded HDR or EXR map. This visual preview helps you confirm that the correct map is loaded and provides a quick reference for its content (e.g., sky, studio, or abstract environment).
Artificial Lighting & HDR tab – Brighter3D settings 1 2 3 4 5 6 7 8 9 10 11 12

Sunlight

  1. 1 Allow Sunlight option enables or disables daylight in your scene. This setting is directly linked to SketchUp’s Shadow Settings, meaning that turning it on or off corresponds to enabling or disabling shadows in SketchUp. When enabled, the sun’s position and intensity are used to illuminate the scene.
  2. 2 Indoor/Outdoor buttons provide quick preset configurations for lighting setups tailored to indoor or outdoor scenes. The Outdoor preset optimizes settings for open environments with strong sunlight and sky contributions, while the Indoor preset is used for indoor scenes.
  3. 3 Sun Samples This setting controls direct sun samples used during rendering. Usually on.
  4. 4 Sky Samples This setting controls direct sky samples used to calculate diffuse sky lighting. Should be off for Indoor scenes.
  5. 5 Indirect Sun toggles indirect (bounced) sunlight calculations. When enabled, the renderer accounts for sunlight that reflects off surfaces, contributing to softer, more diffuse lighting in the scene. Disabling this reduces rendering time but may result in less realistic lighting.
  6. 6 Turbidity setting controls the atmospheric clarity of the sky, affecting the appearance of sunlight and sky lighting. A lower value (e.g., 2) represents a clear sky with sharp, intense sunlight, while a higher value (e.g., 16) simulates a dusty or hazy sky, resulting in softer, more diffused lighting. The default value is 3, suitable for most clear-sky scenarios.
  7. 7 Light Power setting displays the intensity of the sun’s light, as defined in SketchUp’s Shadow Settings. This value is read-only in the renderer but can be modified directly in SketchUp to adjust the sun’s brightness.
  8. 8 Shadow Power setting indicates the strength of shadows cast by the sun, as defined in SketchUp’s Shadow Settings. This value is read-only in the renderer but can be modified in SketchUp to control shadow contrast and darkness.
  9. 9 Time and Date setting displays the current time, date, and timezone used for the sun’s position, as defined in SketchUp’s Shadow Settings. These values are read-only in the renderer but can be adjusted in SketchUp to change the sun’s angle and lighting conditions.
  10. 10 Sky Preview option generates a preview of the sky based on the current sunlight settings, including turbidity and time/date. This helps you visualize how the sky will appear in the render without performing a full render.
  11. 11 Preview image displays a thumbnail overview of the sun and sky based on the current settings. This visual representation shows the combined effect of sunlight, sky lighting, and atmospheric conditions.
Sunlight tab – Brighter3D settings 1 2 3 4 5 6 7 8 9 10 11

Additional

  1. 1 Background – background intensity adjustment (exponential scale)
  2. 2 Direct – artificial direct light adjustment
  3. 3 Indirect – artificial indirect light adjustment
  4. 4 HDR Direct – direct HDR lights power
  5. 5 Smooth camera path – smoother animation path
  6. 6 GUI Large – enlarge UI elements
  7. 7 Frames per Scene Transition – interpolation frames between scenes
  8. 8 Iterations per Frame limit – number of iterations before next animation frame
  9. 9 Reset Additional – reset Additional settings to defaults
  10. 10 Reset All Settings – reset the whole program settings

Adjustment sliders use exponential function 2x
−2.0 means ÷4
−1.0 means ÷2
  0.0 means ×1
  1.0 means ×2
  2.0 means ×4

Additional tab – Brighter3D settings 1 2 3 4 5 6 7 8 9 10

Common settings

  1. 11 Store selected Settings with File – stores the selected settings with the SketchUp file.
  2. 12 Apply – confirm changes.
  3. 13 Render – confirm and start rendering.
  4. 14 Cancel – discard changes.